How to Configure a PSS8 Trinity Controller in the Field on a PRIMUS Sterilizer
Posted by Joey Leffel on Jun 13th 2023
PRIMUS PSS8 Trinity controllers are capable of being configured in the field using one of two methods.
Introduction
One method requires a configuration chip in order to alter the controller’s configuration. The other is done completely through the existing software and does not require a configuration chip.
Method 1
If the controller is running either version 2.710 General Purpose or version 1.200 Healthcare software, then no configuration chip is necessary.
Method 2
If the software version is 2.700 (or less) General Purpose software or 1.100 (or less) Healthcare software, then a configuration chip is required. The configuration chip can be obtained from PRIMUS.
When Is Field Configuration Required?
Under normal circumstances, there should never be a need to do field configuration as every controller is already configured at the PRIMUS factory.
All replacement boards ordered from PRIMUS are also configured to match the site’s sterilizer options before they are shipped. However, there are the rare occasions when the controller’s configuration must be altered in the field.
Example
One example is if the site removed the power door functions from the sterilizer. The PSS8 controller’s configuration would then have to be altered to match the new configuration of the sterilizer.
If a field technician does not know all the option settings, these settings can be obtained by contacting PRIMUS with the sterilizer’s Job Number.
PRIMUS will provide a worksheet showing the correct sterilizer option settings (See Figure 1: STERILIZER CONFIGURATION WORKSHEET).
Procedure Using Software Access (Method 1)
For PSS8 controllers running either version 2.710 General Purpose software or version 1.200 Healthcare software, accessing the configuration mode is done via the use of a special factory password to log into the controller.
The configuration screens can then be reached through the normal MAINTENANCE screen.
The technician servicing the sterilizer will have to obtain the factory password from PRIMUS which allows software access to the configuration screens.
To use the software access follow these steps:
1) Turn on the power to the sterilizer controls using the yellow toggle switch and wait for the system to boot up – this may take several minutes.
2) Wait until the PRIMUS Logo appears on the screen.
3) Select the “STER ON” button to go to the DOOR STATUS screen.
4) Select the “LOGIN” button on the DOOR STATUS screen to go to the USER LOGIN screen.
5) Log onto the sterilizer using the factory password (previously obtained from PRIMUS). Do not enter anything in the ID field.
6) The screen will show a message “Engineer Logged On Touch RETURN,” just above the “ID” and “PASSWORD” buttons. Select the “RETURN” button to close the USER LOGIN screen and return to the DOOR STATUS screen.
7) At the DOOR STATUS screen, select the “MAINT ON” button to go to the MAINTENANCE screen.
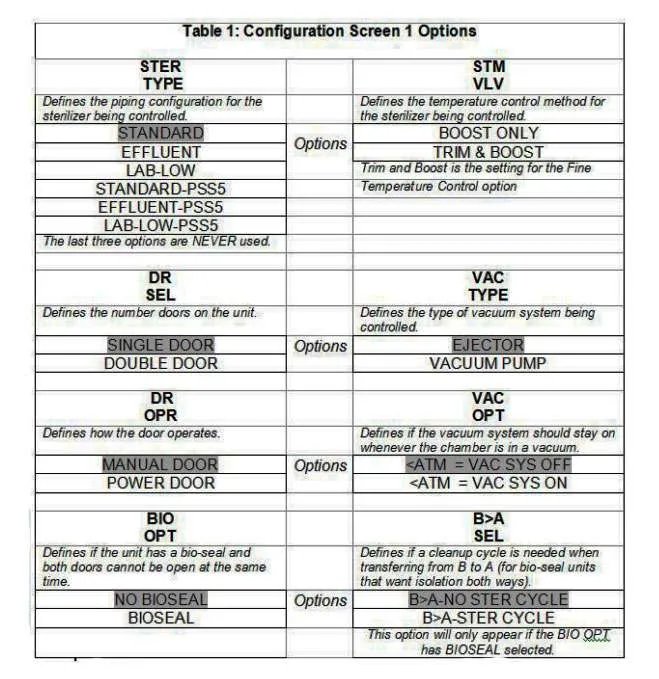
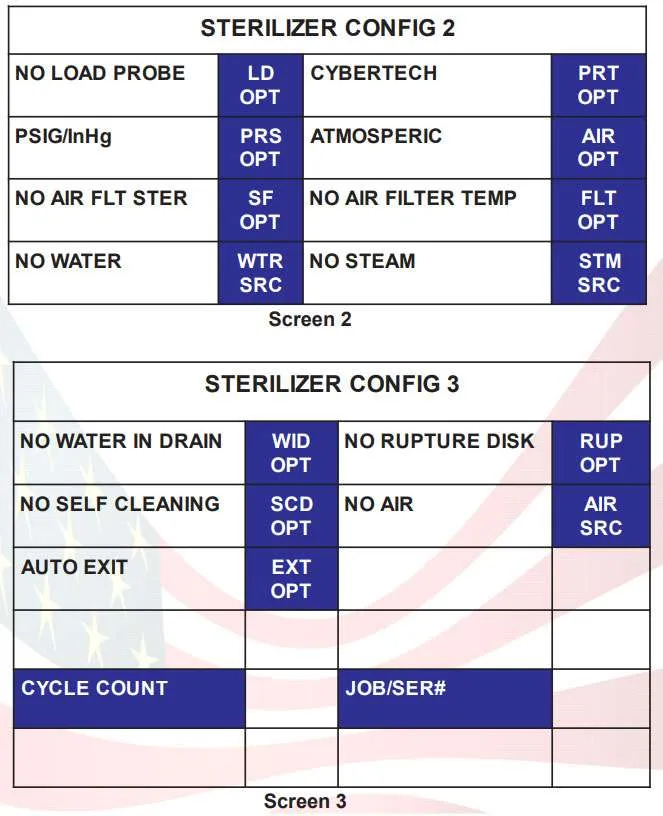
8) Select the “Factory Config” button to go to the STERILIZER CONFIGURATION screen (See Table 1: Configuration Screen 1 Options).
for a list of configuration options for this screen). This is the first of the three configuration screens.
9) Select the configuration option to be changed by touching the blue square at the right of the option.
10) A pop-up menu will appear listing the various available options for that configuration option.
11) Touch the appropriate option to highlight it and then select the “ACCEPT” button.
12) The pop-up menu will close and the configuration option will show the new value.
13) Make sure the option changes to the correct selection. If not, repeat the previous two steps.
14) Set up all the options to their correct values on this screen before going on
to the next screen.
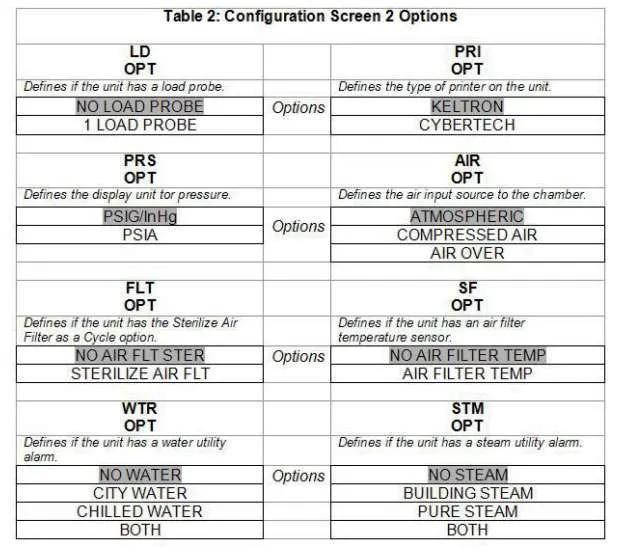
15) Use “CONFIG CONT’D” button to go the second screen STERILIZER CONFIG CONT’D (See Table 2: Configuration Screen 2 Options for a list of configuration options for this screen) and set all the options on the screen. There will only be one button at the bottom of this screen -“CONFIG CONT’D".
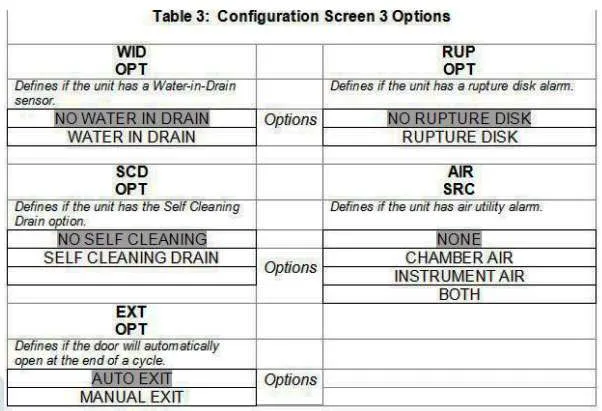
16) Use the “CONFIG CONT’D” button to go to the third screen STERILIZER CONFIG CONT’D (See Table 3: Configuration Screen 3 Options for a list of configuration options for this screen) and set all the options on the screen. There will be four buttons at the bottom of the screen – “RESTORE FACTORY DEFAULTS,” “SAVE,” “RETURN,” and “OP.”
17) Select the green “SAVE” button to save all the changes. A message “Sterilizer Configuration Saved” will appear in green at the bottom of the screen when the save is complete.
18) After the save message appears, select the “OP” button to return to normal operations. The configuration screen will close and the PRIMUS logo screen will be displayed.
19) Power down the control box with the yellow toggle switch, wait 30 seconds and then power it back up. Start the sterilizer, navigate to the configuration screen and verify that all settings remained as set.
The PSS8 controller is now properly configured.
Note: The configuration chip and/or the engineering password should both be kept by the service personnel and not made generally available to the site or shared with others. This guidance has an obvious safety consideration as it would be easy for an untrained person to configure a sterilizer and potentially place it in an unsafe condition.
Additionally, both the PRIMUS configuration chip and the engineering password are both proprietary intellectual property.
Procedure Using a Configuration Chip (Method 2)
Using a configuration chip will place the controller directly into configuration mode and display the first configuration screen, so logon is required.
Note: These instructions only apply to a PSS8 controller running version 2.700 (or less) General Purpose software or version 1.100 (or less) Healthcare software.
First, obtain a configuration chip from PRIMUS. To do this, provide the sterilizer’s Job Number and the software version (this is displayed on the logo screen and printed on the label located on the Operational Software Module chip).
Once the configuration chip is available:
1) Turn off the power to the control box.
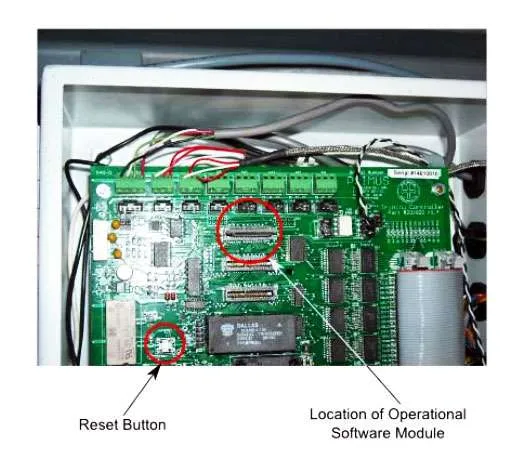
2) Remove the Operational Software Module located in socket U25 on the
control board (see figure below).
3) Insert the software module labeled “Config” in the socket.
Note: The module is polarized and will only fit in the socket in one direction.
4) Turn on the power and wait for the system to boot up – this may take
several minutes.
Once the first STERILIZE CONFIGURATION screen appears, follow the “Procedure Using Software Access” Steps 9-17 (as previously listed above) to set the various options on the configuration screens. The method to set the various configuration options is the same, regardless of how the controller is
put into configuration mode.
6) On the last screen, after selecting “save,” power down the control box using the yellow toggle switch.
7) Replace the configuration chip in socket U25 with the Operational Program Module.
8) Restore power to the system using the yellow toggle switch in the control box.
The table above does not reflect the contents of the actual screen.
BOLD CAPITALS = selectable screen option
CAPITALS = available choices for each option
Italics = definitions and notes about options and choices
Additional Screen 1 Information
In addition to the options above, there are two buttons on the screen - the “CONFIG CONT’D” and “ERASE P RAM.” Selecting the “CONFIG CONT’D” button will move to the second configuration screen.
The “ERASE P RAM” button will reset all the calibrations, cycle information, and then reload the data to the standard PRIMUS factory settings (the highlighted options shown in the tables are the PRIMUS factory standard defaults).
Caution
The “ERASE P RAM” option should only be used as a last resort. If this button is used, then the sterilizer must have the cycle count and Job Number restored, the temperature and pressure RTDs recalibrated and
the individual cycle parameters verified. Any modifications to the standard cycles must be re-entered.
- The table above does not reflect the contents of the actual screen.
BOLD CAPITALS = selectable screen option
CAPITALS = available choices for each option
Italics = definitions and notes about options and choices
In addition to these options, there is one button on the screen - the “CONFIG CONT’D” button. Once all the options are set, selecting the “CONFIG CONT’D” button will move to the third configuration screen.
- The table above does not reflect the contents of the actual screen.
BOLD CAPITALS = selectable screen option
CAPITALS = available choices for each option
Italics = definitions and notes about options and choices
Additional Screen 3 Information
In addition to these options, there are four buttons on the screen – “RESTORE” “FACTORY DEFAULTS,” “SAVE,” “RETURN,” and “OP.”
Once all the options are set, selecting the green “SAVE” button will save the configuration. A message “Sterilizer Configuration Saved” will appear in green at the bottom of the screen. Selecting the “RETURN” button will return to the first configuration screen.
Selecting the “OP” button will return the PSS8 Trinity Controller to normal operations. The configuration screen will close and the PRIMUS logo screen will be displayed.
Caution
Selecting the “RESTORE FACTORY DEFAULTS” button will overwrite the cycle parameters for the first three cycles with standard PRIMUS default values. DO NOT USE this button unless directed to do so by a
PRIMUS technician. If this button is selected, all end user entered changes to the first three cycles will be lost and must be re-entered.
There are two “hidden” buttons: “CYCLE COUNT” and “JOB/STER #.” These two buttons look like standard labels without the normal button border. If the “ERASE PRAM” button has been used, then both “CYCLE COUNT” and “JOB/STER #” will be zero. This is one way to verify the reset has taken place.
Touch the CYCLE COUNT label and a pop-up menu is displayed, allowing the total number of cycles run to be entered. Touch the “JOB/STER #” button and a pop-up menu will be displayed to set the sterilizer Job Number.
Figure 1: STERILIZER CONFIGURATION WORKSHEET

Need assistance? Contact our service department at 877 679 7800.