HOW TO CALIBRATE THE PRIMUS PSS9 PRI-MATIC® STERILIZER
Posted by Joey Leffel on May 8th 2023
The calibration functions are accessed via the MAINTENANCE screen (Figure 1).
The maintenance functions are displayed on the MAINTENANCE screen.
The MAINTENANCE screen’s associated buttons provide access to all maintenance functions.
The calibrator must be logged on to access the Maintenance functions.
To access the MAINTENANCE screen, the maintenance key switch must also be turned to the ON position (the key will be turned to the right).
NOTE
All pressure and temperature devices must be checked and calibrated using National Institute of Standards and Testing (NIST) traceable devices. This must be completed prior to operating the sterilizer.
Figure 1 MAINTENANCE Screen

If the calibrator is already logged on, turning the maintenance key to the ON position will place the sterilizer into Maintenance mode. The MAINTENANCE screen will open and the screen buttons will be immediately accessible. If the calibrator is not already logged on, log on at the MAINTENANCE screen using the LOGIN button.
Access to the various maintenance functions is determined by the LOGIN ID. Not all maintenance functions are available to all LOGIN IDs.
Accessing Calibration Functions
In order to logon and have access to the calibration functions, the operator must be logged on with a LOGON ID of 1 to 7. This requires the calibrator to have an Administrator, Service, or Calibrator LOGON ID to access the calibration functions.
Once the calibrator is properly logged in, the calibrator will select the CALIBRATE button from the MAINTENANCE screen to access the CALIBRATION screen. The CALIBRATION screen will then open (refer to Figure 2 CALIBRATION Screen).
Figure 2 CALIBRATION Screen
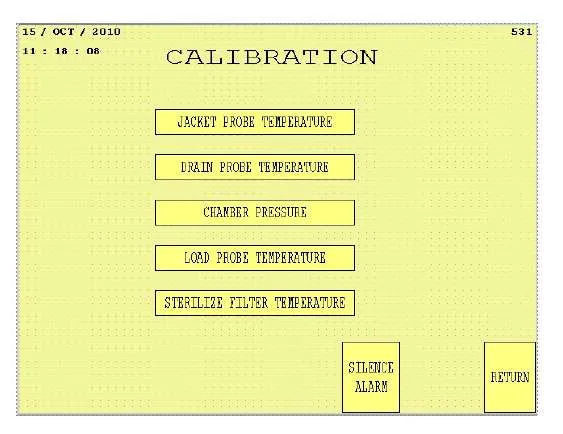
Not all these buttons will be available on the screen as shown in Figure 2. If the sterilizer does not have the Sterilize Filter as a separate cycle option, then the STERILIZE FILTER TEMPERATURE button will not be visible.
This also applies to sterilizers which do not have a load probe option. If the sterilizer is not equipped with a load probe, then the LOAD PROBE TEMPERATURE button will not be visible on the screen.
Temperature Calibration Procedure
Low and high temperature calibration is accomplished by providing a known temperature source to the appropriate sensor and entering the corrected temperature using the OIT keypad entry.
Example: To calibrate the chamber drain probe temperature, the operator would select the DRAIN PROBE TEMPERATURE button from the CALIBRATION screen and the CHAMBER DRAIN PROBE screen will open (refer to Figure 3 CALIBRATE CHAMBER DRAIN PROBE Screen).
Expose the chamber drain probe (RTD) to a known heat source (a heat well is preferable), allowing sufficient time for the probe temperature to stabilize.
If conducting the low temperature calibration of the chamber drain probe, the calibrator selects the LOW CORRECTED TEMP button. A popup keypad will appear. Enter the correct value from the heat well using the popup number pad (this should only be done to one decimal place) and then select ENTER.
The popup screen will close. The calibrator will then select the CAL LOW button to lock in the new value.
The new value will replace the previous value on the screen. If using factory standards for setting the low temperature, this would be 90.0°C. The display will show 090.0 DEG C.
Figure 3 CALIBRATE CHAMBER DRAIN PROBE Screen
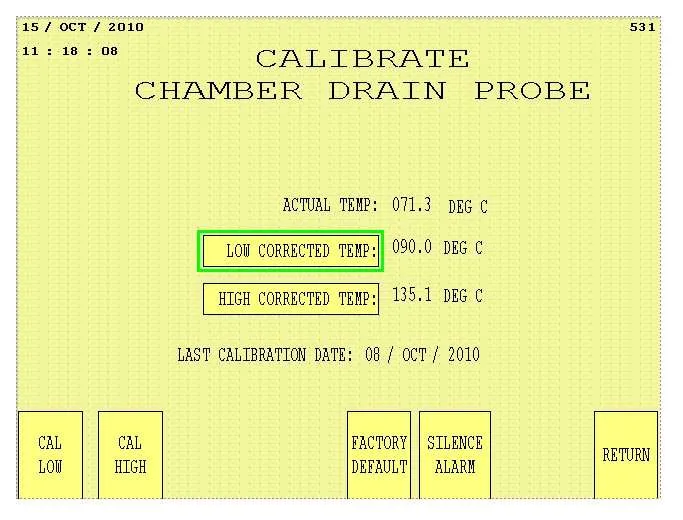
The LAST CALIBRATION DATE will be updated to show when the calibration was done and the printout will show the calibration and new values.
Factory default temperature calibration is accomplished by touching the related push button.
ACTUAL TEMP and LAST CALIBRATION DATE is updated following the pressing of the CAL LOW, CAL HIGH or FACTORY DEFAULT buttons. Factory default uses 0.0 C for LOW CORRECTED TEMP and 130.0 C for HIGH CORRECTED TEMP.
After calibrating the temperature RTDs for low temperature, repeat this procedure for the high temperature, selecting the HIGH CORRECTED TEMP button, entering the value, and then selecting the CAL HIGH button. Again, the date will be updated and the printout will show the calibration values.
Due to the way the controls calculate the scale between low and high temperatures, the upper and lower temperatures displayed may shift slightly after calibrating the opposite value. The calibrator may have to perform low-high calibration up to three times to get the scale to stay steady.
NOTE
The temperature displayed is an interpolated (calculated) value based on scaling by the computer based on the inputs for low and high. This is why the end points may shift slightly when the lower and upper values are set. Calibrate temperature using values as close to factory standard (90.0° C and 130.0° C) as possible to get the most accurate readings.
Pressure Calibration Procedure
Low and high pressure calibration is accomplished by providing a known pressure source to the appropriate sensor and entering the corrected pressure using the OIT key-pad entry.
The operator will be logged on and at the CALIBRATION screen as described above. The operator must have sufficient privileges to do the calibrations (Administrator, Service, or Calibrator LOGIN ID).
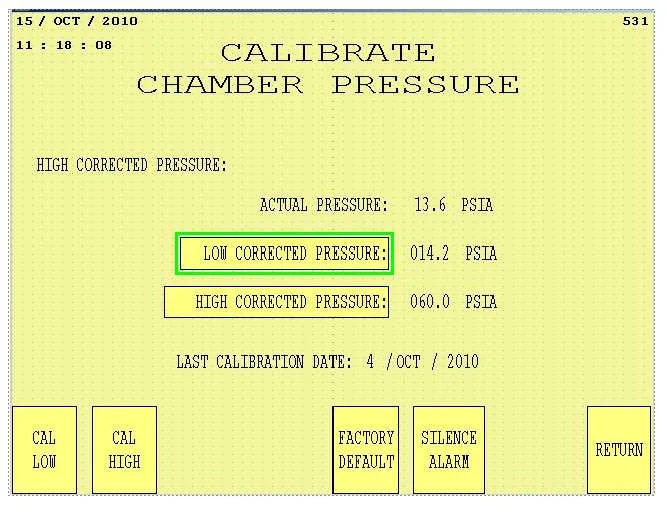
The calibrator will select the CHAMBER PRESSURE button from the CALIBRATION screen. Once the CHAMBER PRESSURE button is selected, the CALIBRATE CHAMBER PRESSURE screen will open (refer to Figure 4 CALIBRATE CHAMBER PRESSURE Screen).
PRIMUS recommends the pressure calibration start with calibrating the low pressure first. The calibrator selects the LOW CORRECTED PRESSURE button and enters the new value using the popup keypad screen. Again, only enter the value to one decimal place.
Once the ENTER key on the popup is selected, the popup screen will close and the new pressure value will be shown. The calibrator will then select the CAL LOW button to lock in the new value.
Since the PSS9 controls are set for PSIA, not PSIG, the low pressure is usually the standard atmospheric pressure (approximately 14.7 PSIA) as corrected for the altitude where the sterilizer is located. Thus, the calibrator would not enter the usual 0.0, but instead 14.7 for zero pressure in the chamber.
Factory default pressure calibration is accomplished by touching the related button. ACTUAL PRESSURE and LAST CALIBRATION DATE is updated following the pressing of the CAL LOW, CAL HIGH or FACTORY DEFAULT buttons.
Factory default uses 0.0 for PSIA LOW CORRECTED PRESSURE and 60.0 PSIA for HIGH CORRECTED PRESSURE.
Figure 4 CALIBRATE CHAMBER PRESSURE Screen
NOTE
Just like temperature, this is a calculated value so the display end points may shift when the opposite value is calibrated. Again, it may take up to three times calibrating the low-high pressure for the end points to stabilize.
If the sterilizer is equipped with a pressure transmitter, there may be a separate display showing what the transmitter is reading. This transmitter display and the sterilizer display will differ during operation due to inherent delays in reading the pressure and the controller putting in a correction based on calibration values.
After calibration, use the RETURN button to return to the CALIBRATION screen. Use the RETURN button to return to the MAINTENANCE screen.
The calibrator can then log out. The calibrator must turn the maintenance key to the OFF position (to the LEFT) to return the sterilizer to normal operations. Operators will then have to login to run the sterilizer.
The SILENCE ALARM button turns off the audible alarm notification.
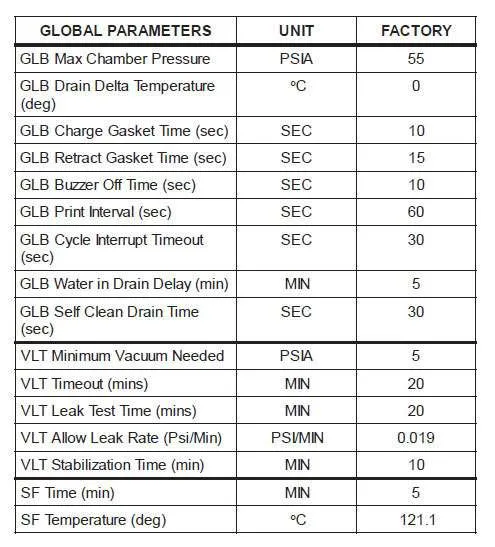
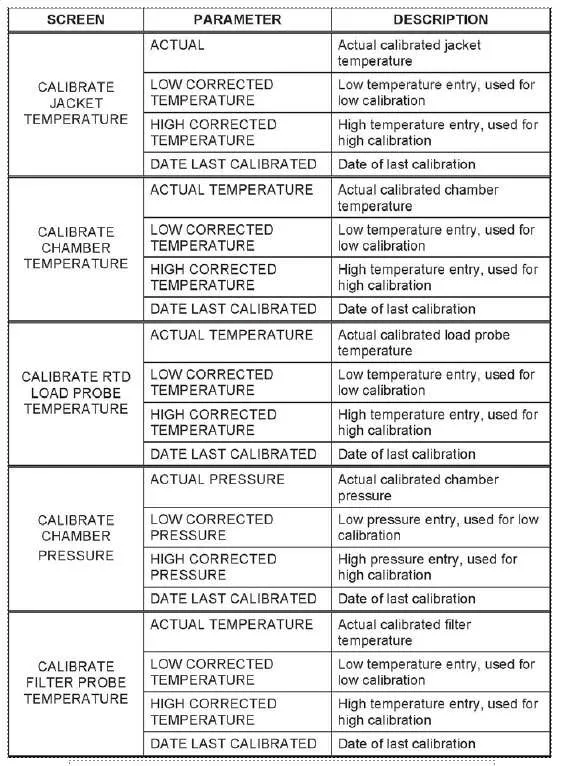
Reference Tables
Two tables are provided as a quick reference to the calibration screens.
The first table, Table 1 Calibration Parameters, lists the various calibration screens, the parameters available on the screen, the input units, and the upper and lower limits for each parameter.
Calibration parameters
Have questions?
Contact our in-house PRIMUS sterilizer expert, Dave Schall at 877.679.7800 x1212 or by email at dschall@spire-is.com.
Visit our website at www.spire-is.com